|
|
Clinical Study A - Ultrasound Data Annotation Manual |
||||||||||||||||||||||||||||||||||||||||||||||||||||||||||||||||||||||||||||||||||||||||||||||||||||||||||||||||||||||||||||||||||||||||||||||||||||||||
|
Clinical Study A - Ultrasound Data Annotation Manual 1. IntroductionThis document (manual) outlines the step-by-step procedure for accessing and annotating data on the V7 labs Darwin annotation platform, that will be used for the development of the AI models for the ThrombUS+ project. 1.1. Labelling of Vascular Structures1. Goal: Accurate identification and labelling of anatomical structures and potential pathologies. 2. Label: Segmentation mask (anatomical structures tracing) for the following categories: - Target Veins: Key focus for DVT diagnosis: • Common Femoral Vein (CFV) • Great Saphenous Vein (GSV) • Femoral Vein (FV) • Popliteal Vein (PV) - Accompanying Arteries: Helps distinguish arteries from veins and supports pressure assessments: • Common Femoral Artery (CFA) • Deep Femoral Artery (DFA) • Femoral Artery (FA) • Popliteal Artery (PA) - Clots: Thrombi clots. - Other: Pathologies or structures that may be mischaracterized as DVT (other pathology class) 1.2. Ultrasound Image Grading of Target Veins1. Goal: Evaluate ultrasound image quality to determine their suitability for diagnostic purposes. 2. Label: Classification Tag based on the American College of Emergency Physicians (ACEP) five-point grading scale Table 1. - Scores 1-2: Non diagnostic. - Scores 3-5: Diagnostic
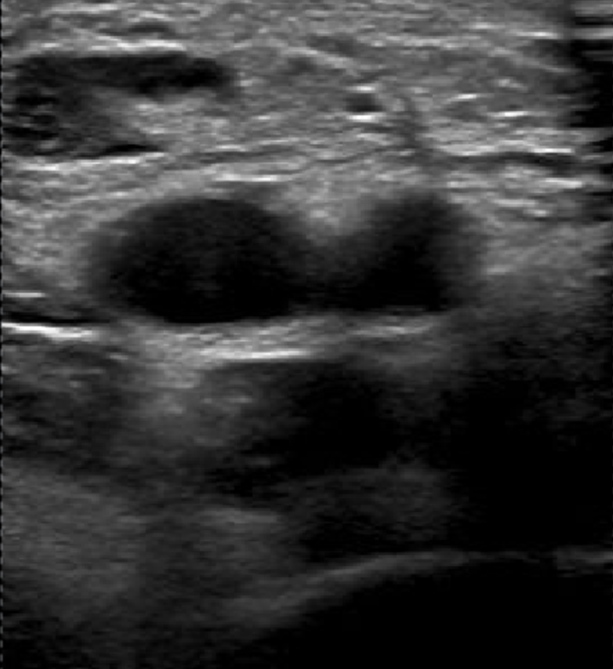
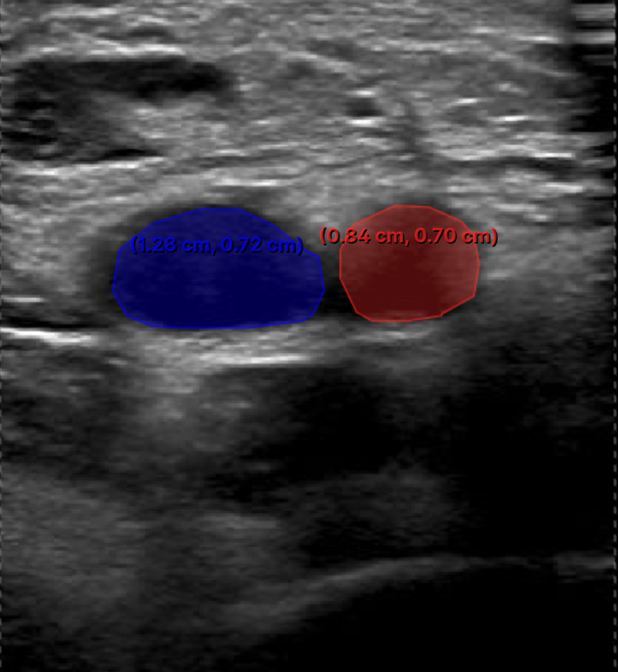
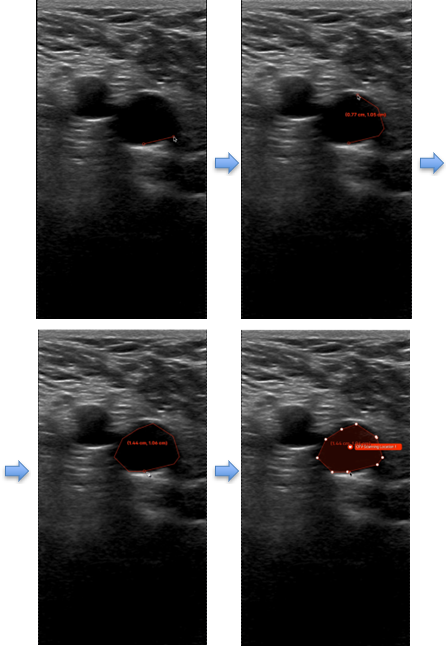
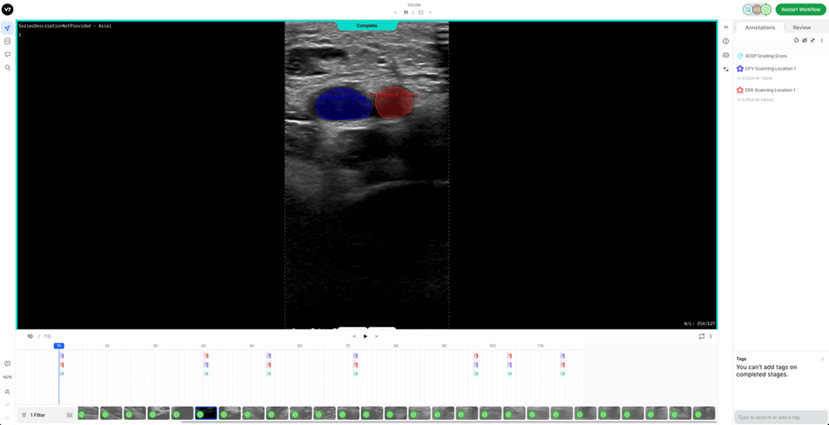
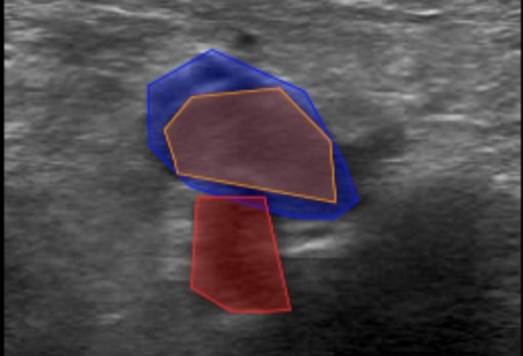
2. Labelling InstructionsThe following is a set of instructions for the annotation of the ultrasound images/videos during ThrombUS+ Clinical Study A. Frames must be annotated based on the diagnostic criteria used during a DVT exam to capture clinically relevant information. - In a DICOM video on V7, please disregard the first four frames and begin labelling from the fifth frame onward. - On average, 5 to 7 frames should be annotated per video to balance data richness and labelling efficiency. - For an inadequate DICOM image on V7, apply the corresponding ACEP grading score and, if image quality permits (ACEP grade >=2), segment (trace) all visible structures, including veins, arteries, and clots. The key frame selection criteria for the DICOM videos include: 1. Non-compressed/Neutral phase (1 frame): a) Frames where veins are of their original shape and size representing the neutral non-compressed state (Figure 1). b) In some cases, the video may begin in a partially compressed state. If the neutral phase of the vessels appears later in the clip, after compression is released, please ensure it is still annotated.
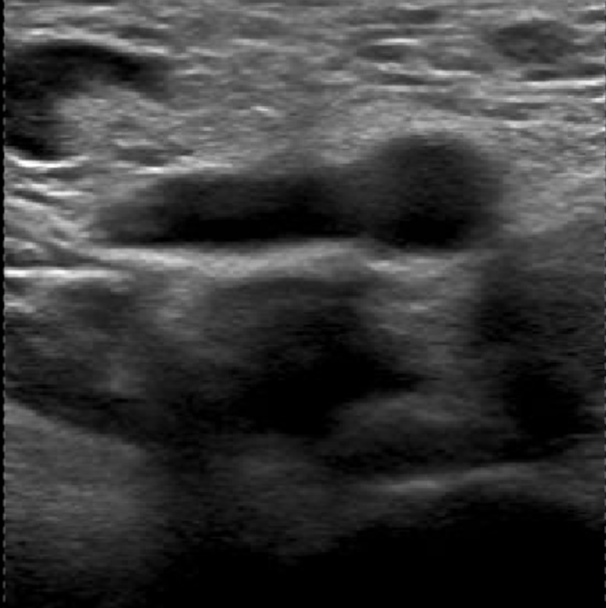
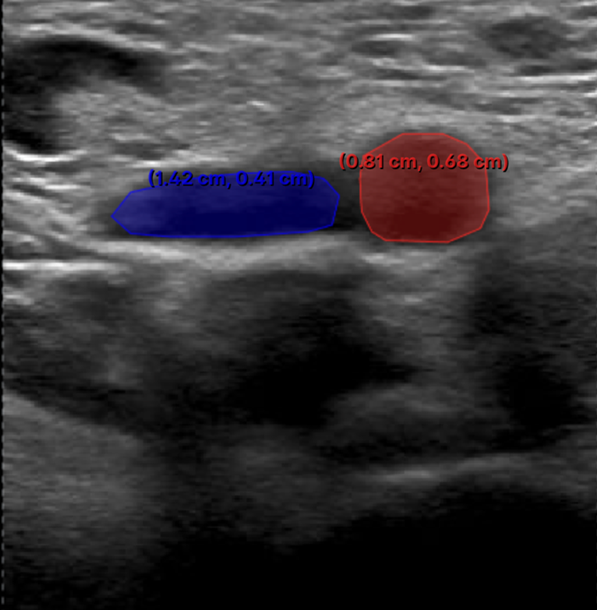
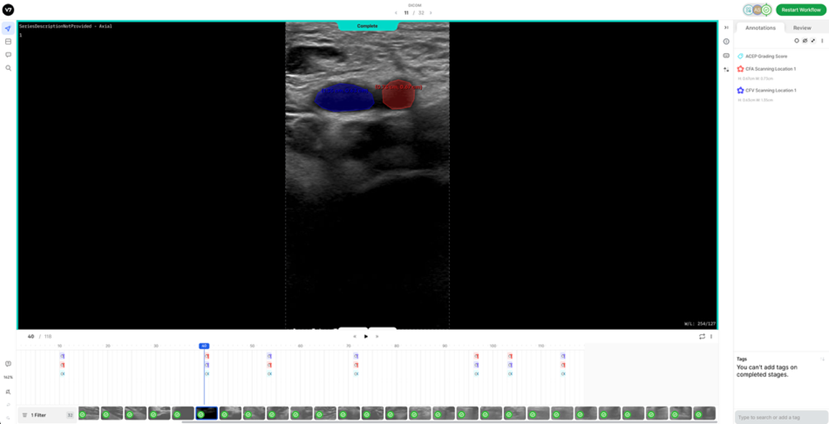
2. Mild-Compression Phase (2-3 frames): a) Frames where veins are partially compressed (Figure 2). b) A total of 2-3 frames should be labelled. - One frame should be selected a few frames after the neutral phase, where the vein has visibly decreased in size. - Another should be chosen a few frames before the vein is fully compressed or collapsed, showing a significant reduction in size. - If possible, an additional frame can be included between these two points.
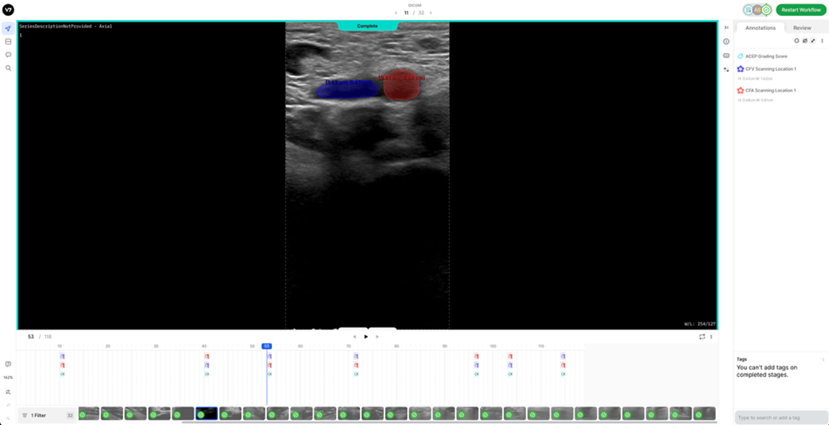
3. Peak Compression Phase (1 frame): a) Frames where veins either collapse or fail to collapse under applied pressure should be labelled. - For normal patients: The vein will collapse completely, and this frame should be labelled. Even if the collapsed vein is difficult to distinguish, a very thin segmentation mask (tracing) should be applied where its border is best estimated. - For pathological patients: The vein will not fully compress, but a segmentation mask is still required at the frame where peak pressure is applied (usually when the accompanying artery is slightly deformed).
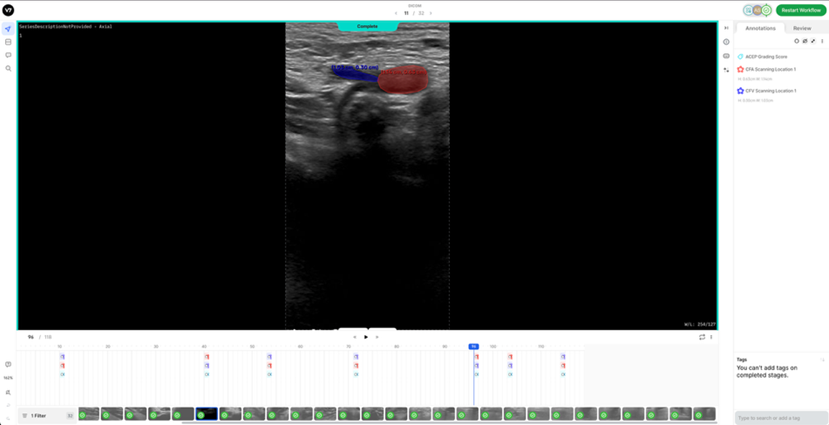
4. Artery Deformation (1-2 frames): a) In addition to the previously mentioned key frames, where all visible veins, arteries, and clots are labelled, please also annotate 1-2 frames capturing the deformation of the arterial walls. b) This marks the point at which compression should be stopped, especially in pathological cases where the compression increases, and the vein fails to collapse.
3. Registration and Login3.1. Creating a V7 Labs Darwin AccountYou will receive an email invitation from Echonous to join the V7 annotation platform (Figure 5). This invitation will be sent to the same email address you use for ThrombUS-related tasks and meetings. The email includes a registration link to create your V7 annotator/worker account. 1. Click the "Join the Team" button in the email. 2. Enter your first and last name, set a strong, unique password, and complete your account setup (Figure 6). 3. Store your password securely and do not share it to maintain data confidentiality and security. Once your account is set up, you can proceed with the annotation workflow detailed in the following sections.
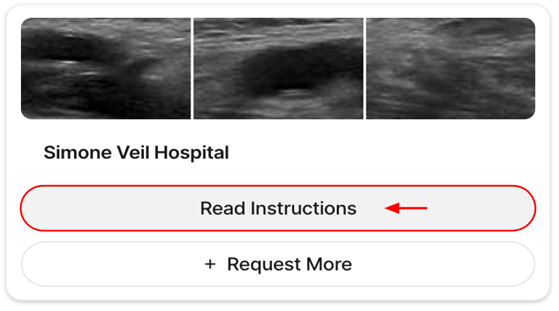
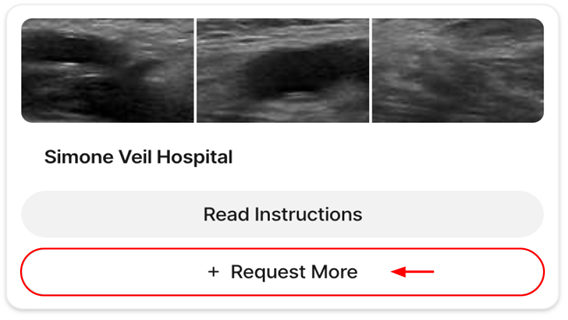
*Please note that the link above expires after first use. To access your account after its creation, navigate to the V7 Darwin login page and enter your email address and password configured during the registration process. 4. Requesting and Accessing Data on V7After logging into the annotation platform, you will see a dashboard displaying your hospital's dataset. From here, follow these steps (Table 2):
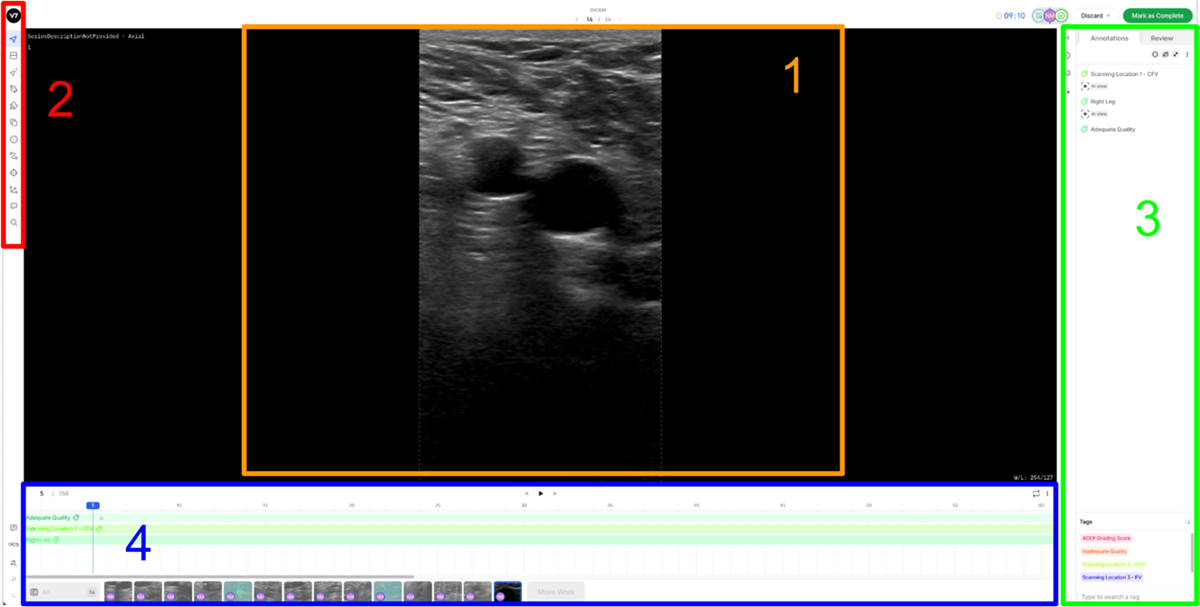
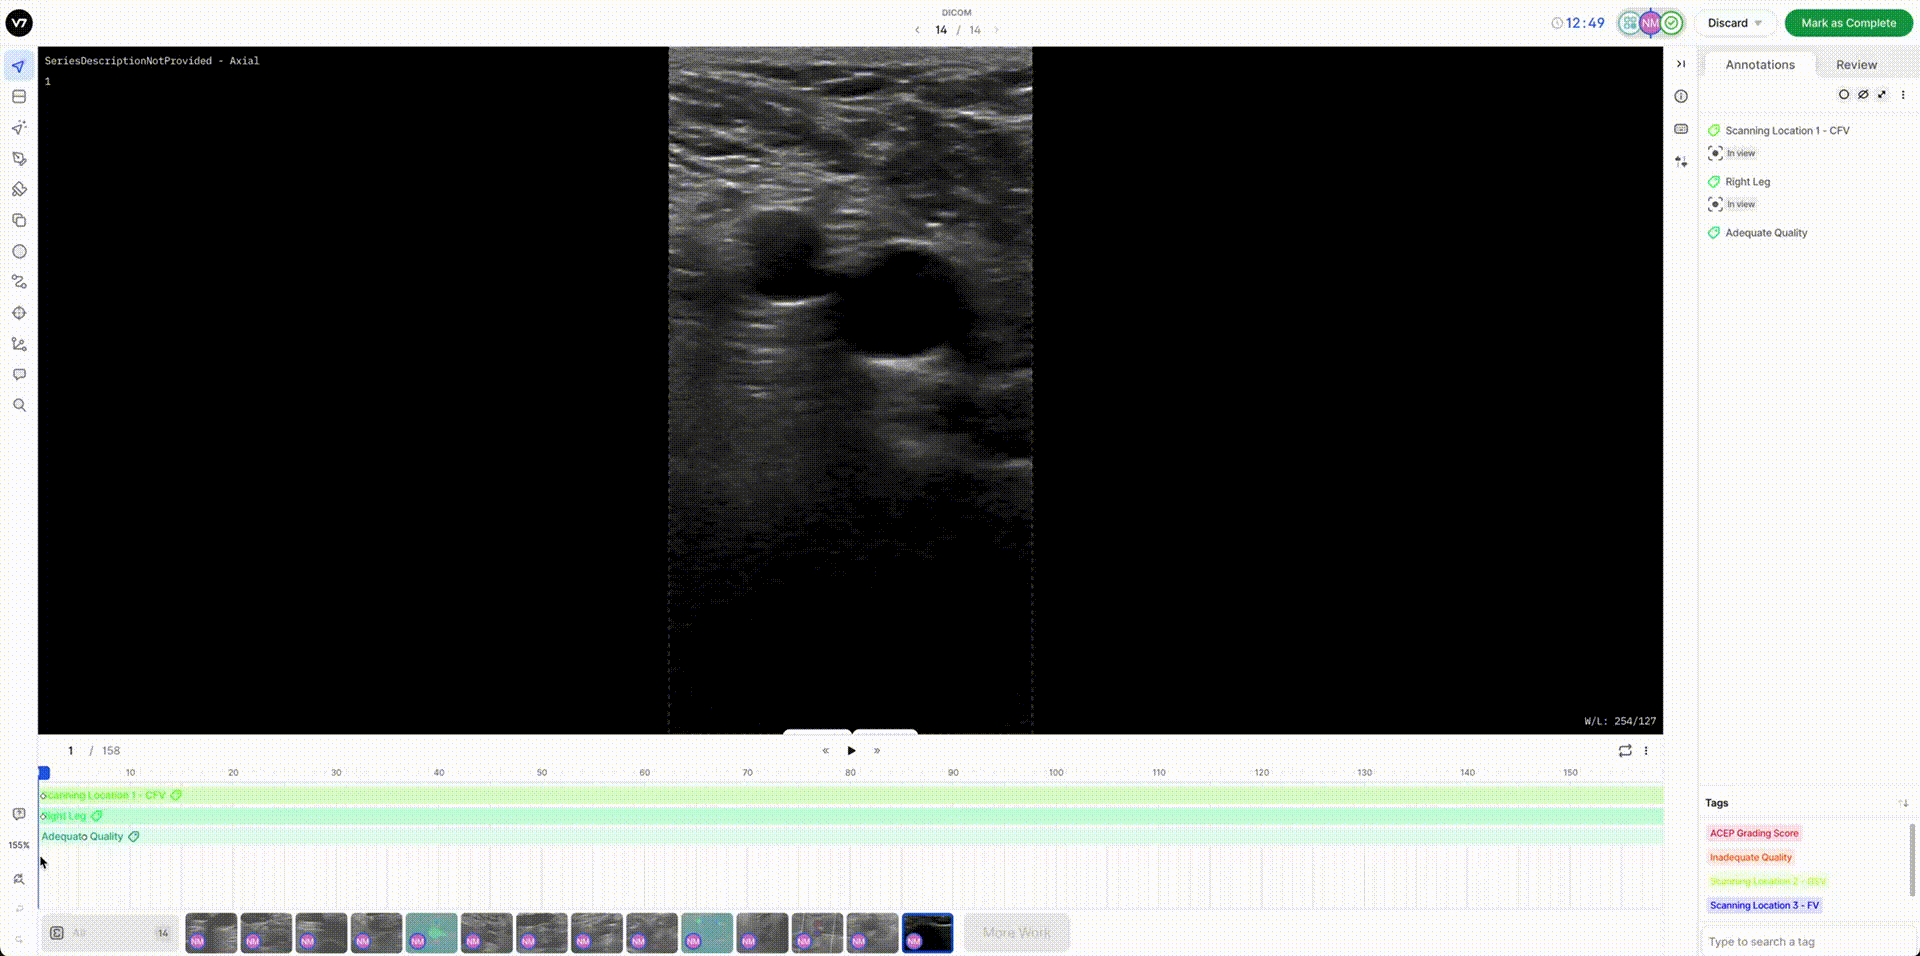
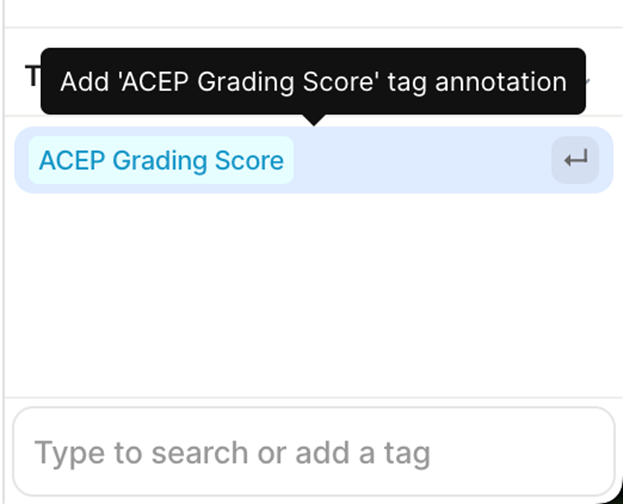
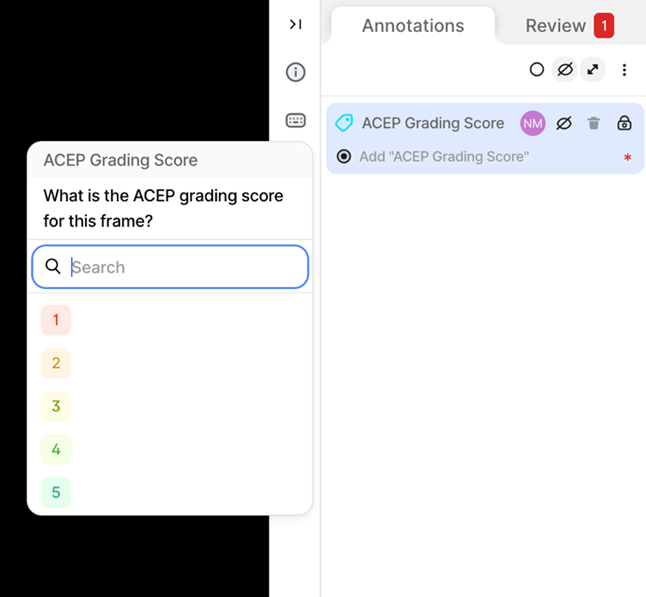
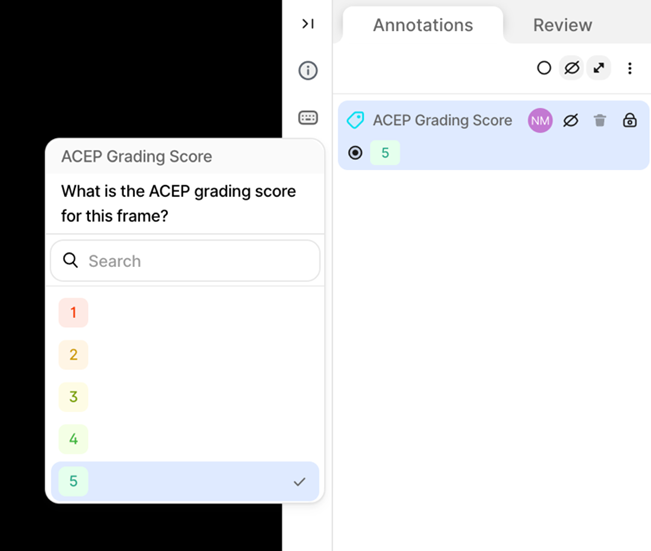
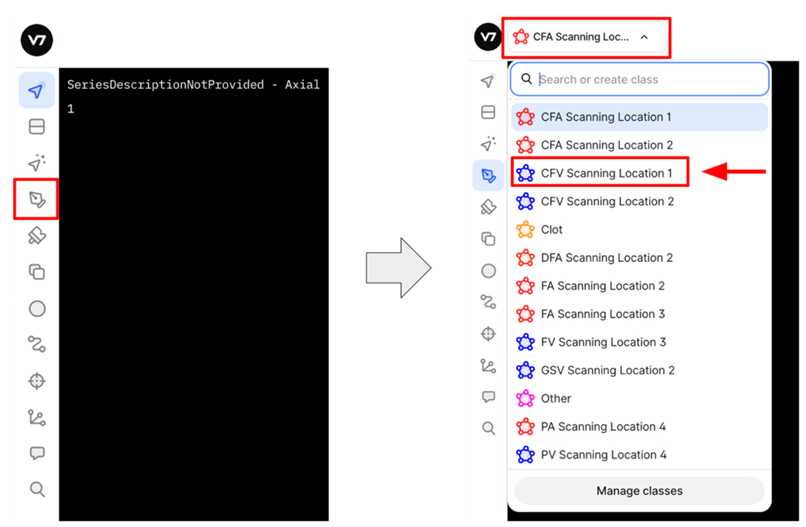
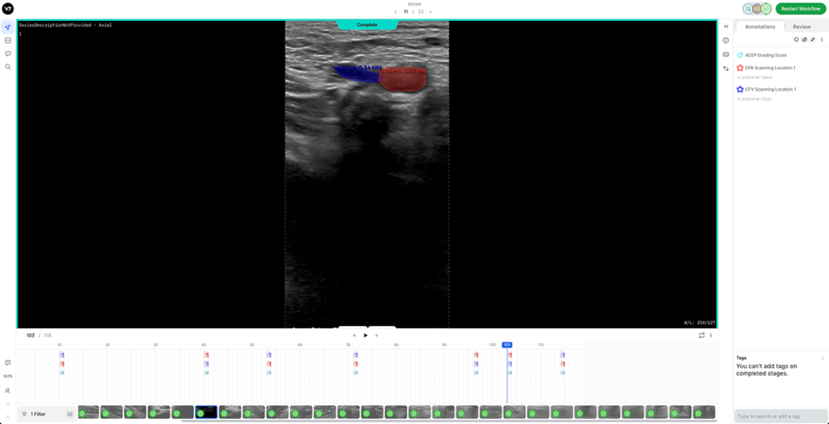
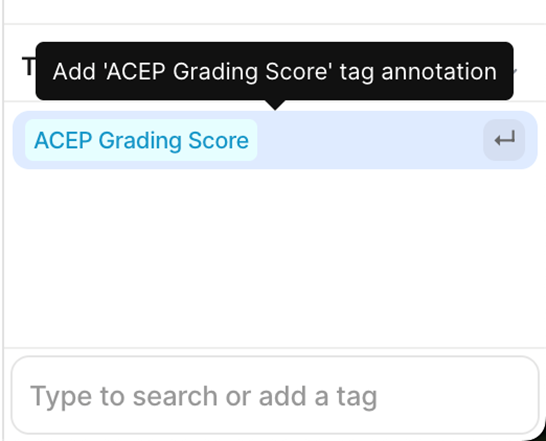
5. V7 Annotation Interface BasicsAfter clicking on the blue button (Table 2 - step 3), you will be redirected to the annotation interface (Figure 7). This screen is divided into four main sections, each designed to streamline the annotation process. Below is a brief overview of these sections, including how to navigate and interact with them to ensure accurate data labelling for AI model development. 1. Main Canvas (Video/Image Display Area) The Main Canvas is the central workspace where medical images or video frames appear. You will interact with the dataset here by placing, adjusting, and reviewing annotations. 2. Annotation Tools Sidebar Located on the left side of the screen, the Annotation Tools Sidebar provides various annotation tools for labelling data, but for our purposes the one you need to use is the polygon tool. 3. Active Annotations Sidebar Located on the right side of the interface, the Active Annotations Sidebar serves two primary functions. The top section allows you to manage and organize the labels assigned to the current video frame or image. Below, in the Tags section, you will find all available annotation tags. However, for this process, only the ACEP Grading Score tag should be selected. 4. Bottom Bar (Navigation & Playback) The Bottom Bar has two key functions: selecting the clip or image for labelling and, for video clips, navigating through individual frames.
6. Step-by-Step DICOM Video Labelling Procedure on V7The following guide outlines the step-by-step process for labelling key frames in a DICOM clip on V7 (Table 3). This process should be repeated for each key frame specified in Section 2: Labelling Instructions, which includes: - Non-compressed/Neutral Phase (1 frame). - Mid-Compression Phase (2-3 frames). - Peak-Compression Phase (1 frame). - Artery Deformation (1-2 frames).
7. Reference DICOM Clip AnnotatedBelow is a reference DICOM video containing all the annotations for a normal patient (CFV Scanning Location 1, CFA Scanning Location 1, ACEP Grading Score) (Table 4) on each of the following frames according to the Section 2: Labelling Instructions: - Non-compressed/Neutral Phase (1 frame) - Mid-Compression Phase (3 frames) - Peak-Compression Phase (1 frame) - Artery Deformation (2 frames)
|
|||||||||||||||||||||||||||||||||||||||||||||||||||||||||||||||||||||||||||||||||||||||||||||||||||||||||||||||||||||||||||||||||||||||||||||||||||||||||
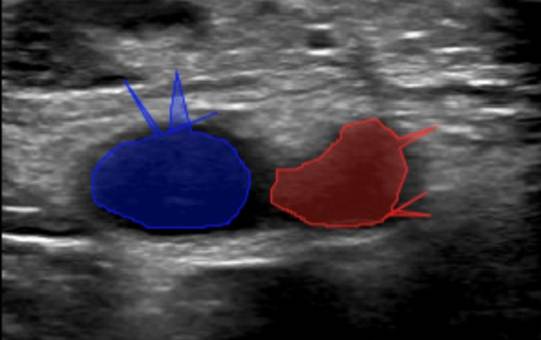
8. Common V7 Labelling Issues & Best Practices1. Excessive Number of Annotation Points - Issue: • Over-annotating vascular structures by adding too many points. - Impact: • Introduces spikes and irregularities in the shape contour. • Complicates segmentation mask adjustments. • Slows down the labelling workflow due to unnecessary complexity. - Recommendation: • Use only the minimum number of points necessary to trace the anatomical structure accurately.
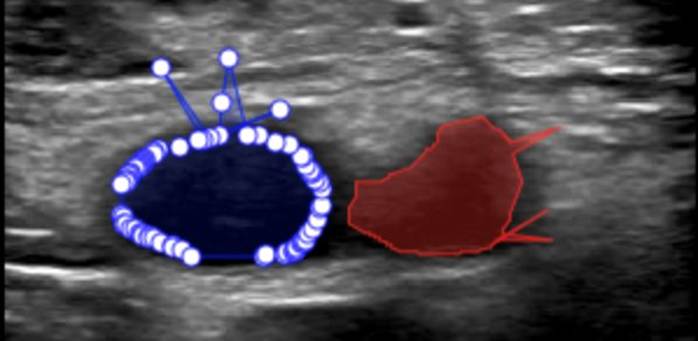
2. Insufficient Number of Annotation Points - Issue: • Using an insufficient number of annotation points to trace anatomical structures. - Impact: • Leads to poor geometric approximation of the true anatomical structure. • Reduces model performance due to inadequate training data. - Recommendation: • Ensure sufficient points are added to preserve anatomical fidelity.
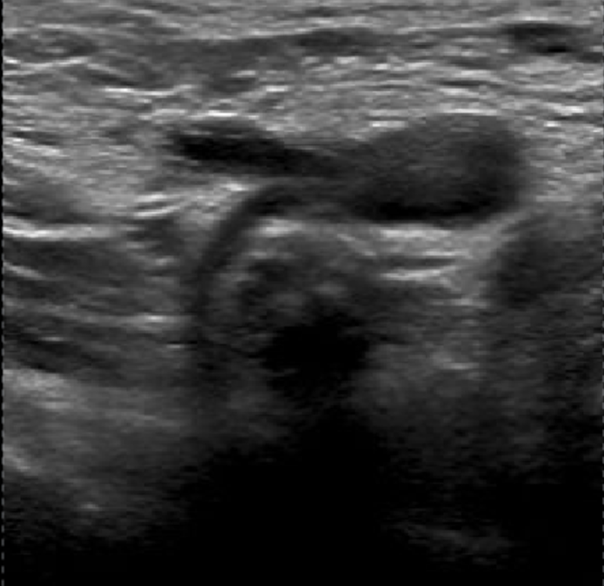
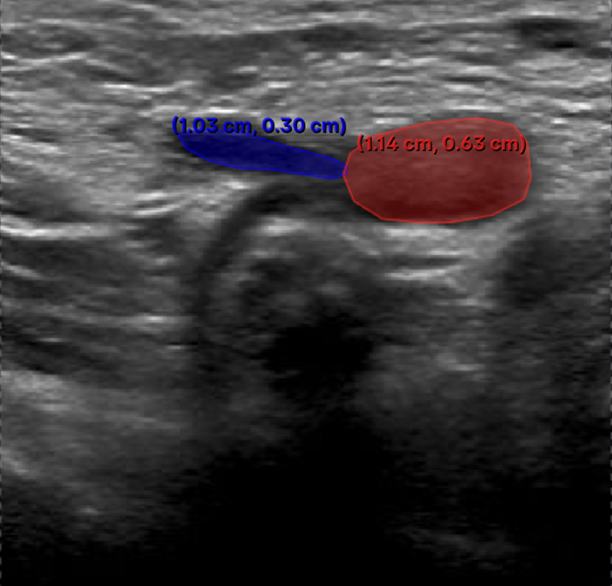
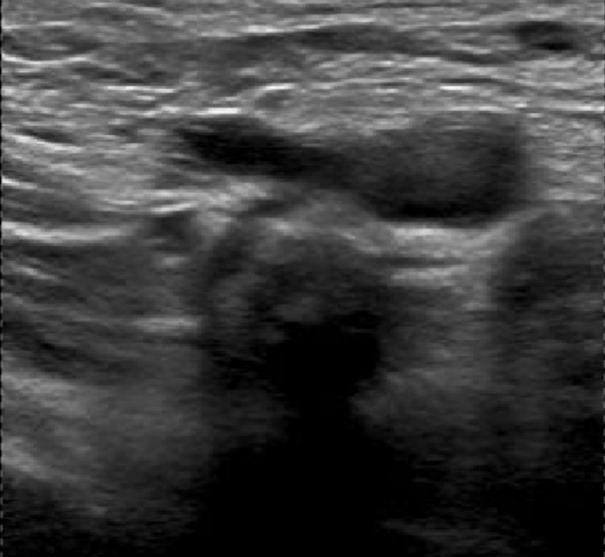
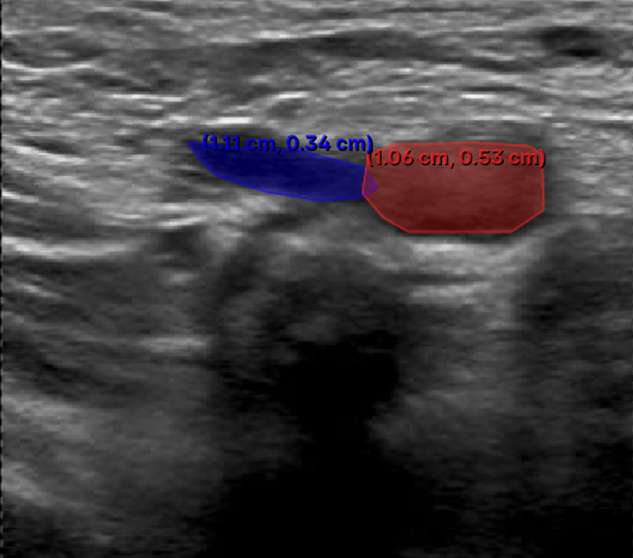
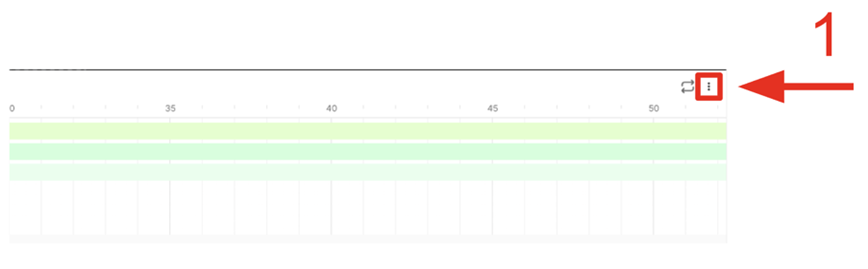
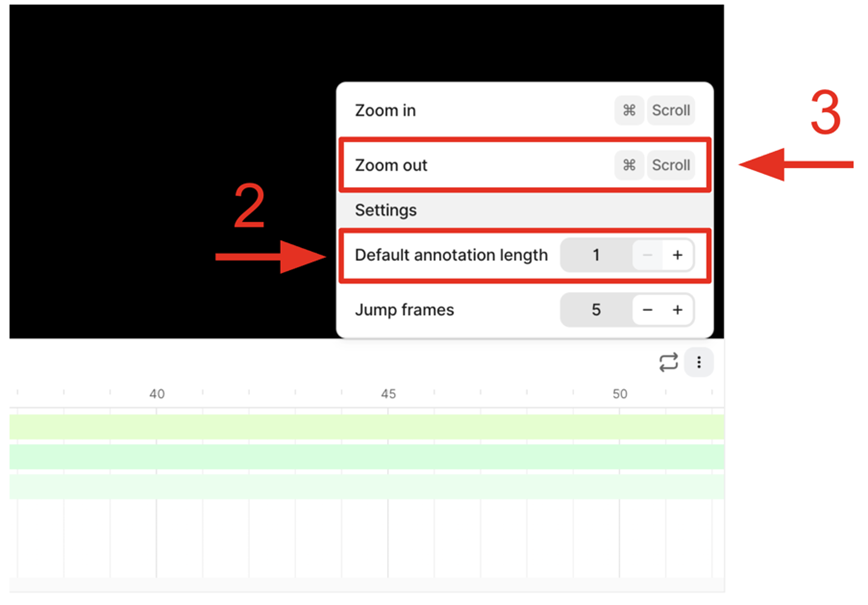
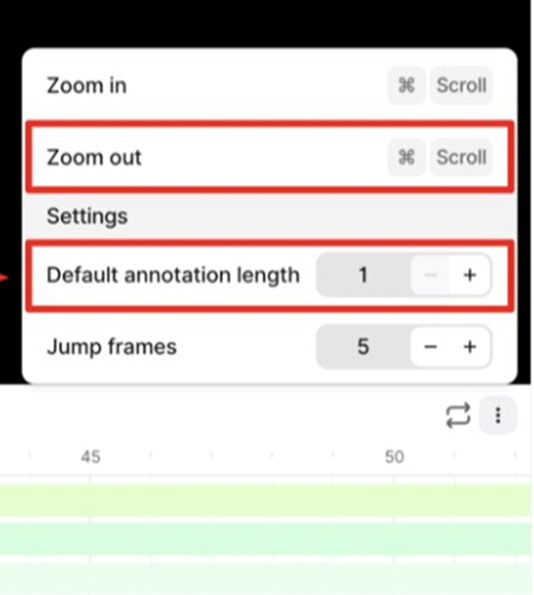
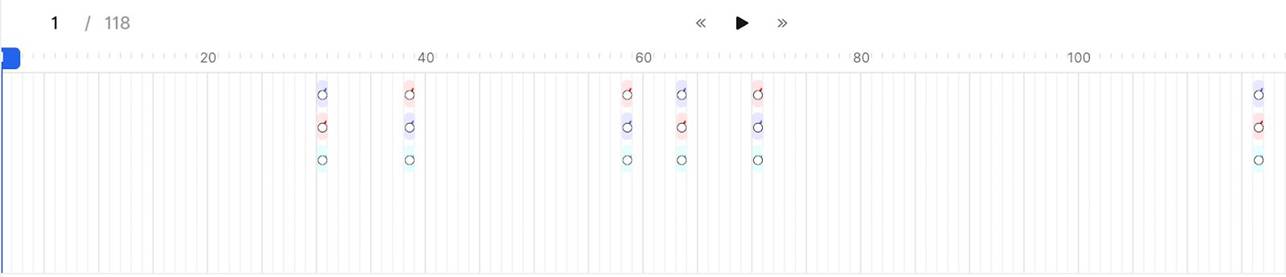
3. Incorrect Annotation Propagation - Issue: • Annotations are unintentionally extended across multiple frames (30 by default). - Impact: • Annotations are replicated across unintended frames (29 extra). • This introduces significant errors. - Recommendation: • Set the annotation length to 1 frame to restrict it to the intended frame only.
Labels if default annotation length = 30 (Incorrect):
Labels if default annotation length = 1 (Correct):
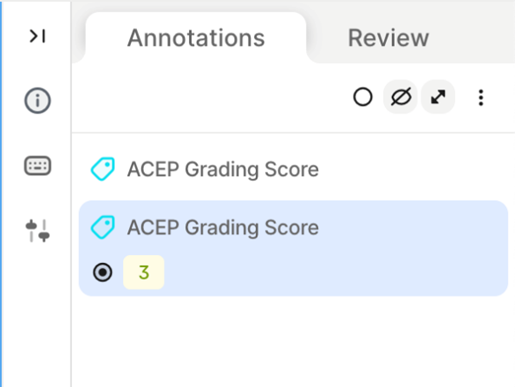
4. Missing ACEP Grading - Issue: • Omission of the ACEP Grading score in annotated frames. - Impact: • Results in incomplete metadata. • Reduces the labelled dataset's utility for AI model training. - Recommendation: • Always assign an ACEP Grading score, even for random or inadequate frames.
5. Missing Segmentation Masks in Random/Inadequate Frames - Issue: • Segmentation masks are sometimes skipped in frames marked as inadequate with an ACEP grading score >= 2. - Impact: • Results in missed opportunities to train the model on visible structures, even in low-quality frames. • Limits the diversity of training data. - Recommendation: • Include segmentation masks for all frames with any recognizable structures (ACEP Grading Score >= 2) 6. Labelling Inconsistencies - Issue: • Segmentation masks are occasionally applied to frames marked as ACEP Grading 1 (no recognizable structures). - Impact: • Degrades overall data integrity. - Recommendation: • Ensure alignment between ACEP Grading and segmentation presence. Do not add masks to frames graded 1, where by definition no recognizable structures exist (ACEP grading score 1 = No recognizable structures, no objective data can be gathered). 7. Use of Wrong Segmentation Mask - Issue: • Used the wrong anatomical structure and/or scanning location. Each segmentation mask includes both the vascular structure and its corresponding scanning location (Scanning Location 1 to 4). - Impact: • Creates inconsistency in dataset labelling standards and can lead to deteriorated model performance. - Recommendation: • Select the correct segmentation mask by verifying both the vascular structure and scanning location before finalizing annotations. Refer to the standardized labelling guidelines for each location. 8. Duplicate ACEP Grading on the Same Frame - Issue: • ACEP grading applied more than once on a single frame, sometimes repeating the same grade or applying different ones. - Impact: • Creates ambiguity and inconsistency in grading labels. • Can lead to conflicts in automated evaluation systems. - Recommendation: • Ensure only one ACEP grading score is applied per frame. Review before submitting to avoid duplicates.
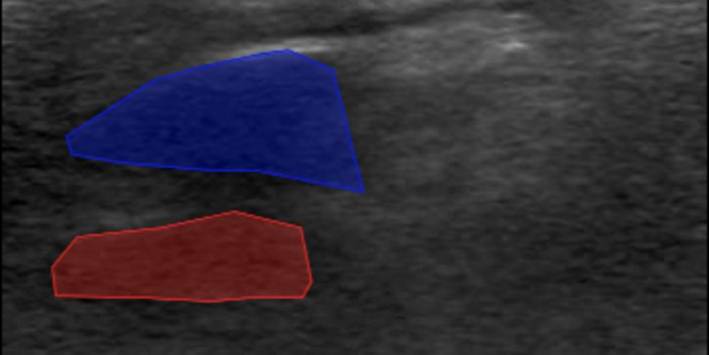
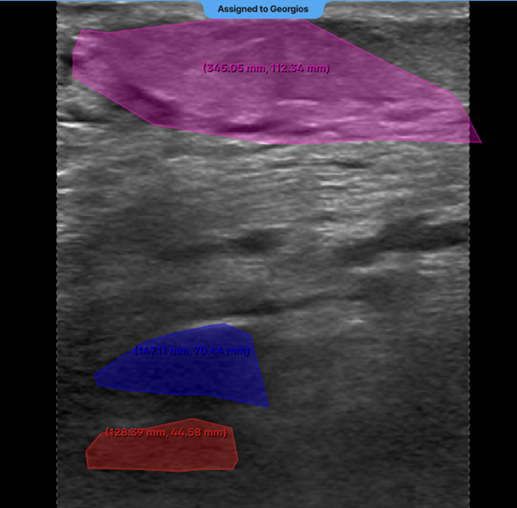
9. Segmentation Masks Extending Outside the Ultrasound Area - Issue: • Segmentation masks drawn beyond the visible ultrasound region in the main canvas. - Impact: • Decreases the accuracy of the labelled region. • May cause errors in downstream label processing. - Recommendation: • Apply all segmentation masks strictly within the ultrasound-visible area.
|
|||||||||||||||||||||||||||||||||||||||||||||||||||||||||||||||||||||||||||||||||||||||||||||||||||||||||||||||||||||||||||||||||||||||||||||||||||||||||